Today, we dive deep into the world of Phoenix. We’ll cover everything from his abilities and playstyle to 15 crucial tips by our pro players. By the end of this guide, you’ll have all the knowledge you need to start entry fragging and dominating for your team with Phoenix.
Basic Playstyle for Phoenix Players
On Attack
Phoenix is the epitome of an entry fragger. Your primary job on the attackers’ side is to run in, do as much damage, and get as many kills as possible before dying. Remember, your role is to die for your team to gain control of the site, and everything after that is a bonus. Think of yourself as an escort, creating space and time for your team to follow up and secure the site.
Out of all other Valorant agents, one of Phoenix’s strengths on attack is his ability to split pressure. His utility – the flame wall, flashes, and molly – allows him to solo pressure a site, forcing rotations while your team pressures another site. This is particularly effective on rotate-heavy maps like Haven. By causing chaos at B site, you can force rotations and make it easier for your team to take control of A or C sites with minimal resistance.
On Defense
On defense, Phoenix excels at making aggressive or proactive plays. The key here is unpredictability. Aggressive plays should be timed when the enemy team is defaulting or has ignored your site, allowing you to get a crucial flank or pick. Always coordinate with a teammate to watch your push early in the round to avoid being caught off guard.
Phoenix can also be effective by holding safe angles and using his utility to delay enemy pushes. His molly and flashes can buy time for your teammates to rotate and support you. Play with calculated aggression to secure picks safely or lockdown a site and delay the enemy team’s advance.
Abilities and Their Interactions
Blaze (Flame Wall)

Blaze creates a flame wall that blocks vision and damages players who pass through it. This ability can be curved by holding down the mouse button and following the direction of your crosshair. It lasts for 8 seconds and heals Phoenix for 50 health if he stands in it for the entire duration. Blaze is crucial for blocking enemy flashes and protecting your team, especially when combined with your flashes to take bomb sites effectively.
Curveball (Flash)

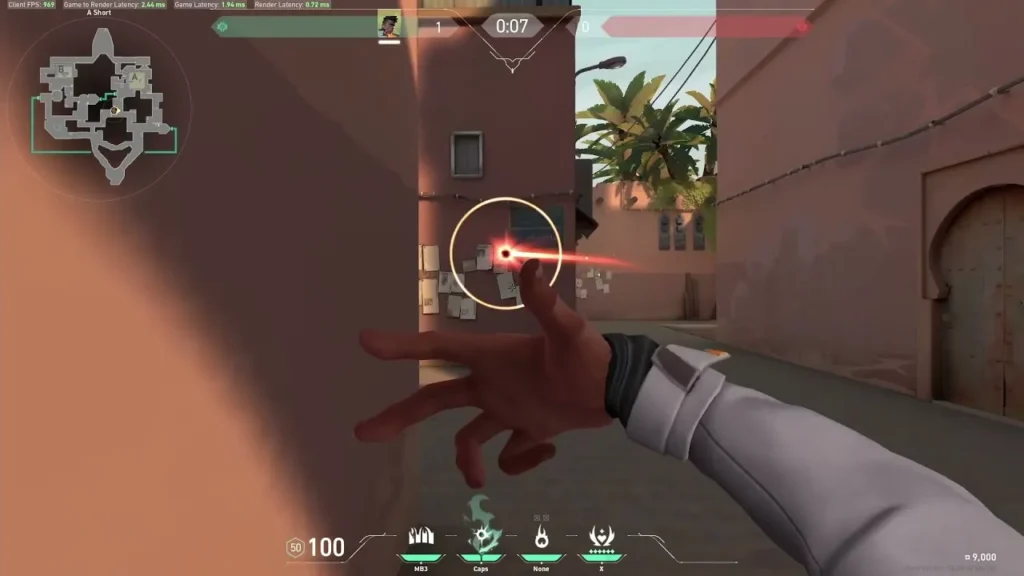
Curveball is Phoenix’s most well-known ability. You can have two curveballs, costing 200 credits each. They curve left or right depending on which mouse button you use. The flare orb blinds enemies for up to 1.1 seconds, depending on how close they are to looking directly at it. This ability is vital for entry fragging and securing easy kills on blinded enemies.
Hot Hands (Molly)

Hot Hands is Phoenix’s signature ability, available every round and recharges after two kills. It damages enemies and heals Phoenix for 50 health if he stands in it for the entire duration. Use Hot Hands to block enemy pushes or clear difficult areas. Throw it in doorways to create space for your push or catch enemies off guard by walking through your own fire and flashing out.
Run It Back (Ultimate)

Phoenix’s ultimate ability drops a marker that he will return to upon death or when the time expires. This ability is an entry fragger’s dream, allowing Phoenix to run in, deal damage, and get a second chance to join his team on the site take. Use Run It Back from a safe location and coordinate with your team to protect your body and capitalize on your entry fragging.
Learning from Subroza
Deep Flanking
Subroza demonstrates effective deep flanking by coordinating with his team’s pressure. He times his push to capitalize on enemy rotations, creating opportunities for his team to take control of the site. By being patient and checking the minimap, Subroza ensures his flank is impactful, even if he misses his shots initially.
Jiggle Peeking and Aggression
In early rounds, jiggle peeking for information can lead to easy picks. Subroza’s aggressive play against Sova shows the importance of timing and falling back to defend after securing a kill. Avoid overextending and maintain your advantage by holding key areas and supporting your team.
15 Best Tips While Playing Phoenix
Phoenix was once considered one of the weakest duelists in Valorant. However, thanks to the creative minds in the community and a deeper understanding of the game, Phoenix has become much more viable and powerful. As a unique duelist, Phoenix offers aggressive play potential, escapability, and outplay opportunities using his abilities. Now let’s look at ten of the best tips while playing Phoenix.
1. The Bank Flash (XTR Flash)
The bank flash enables quick peeks by bouncing the flash off a flat surface. This tech is situational but excels in 1v1 situations where the enemy will be fully blinded, giving you the upper hand. To perform this flash, stand against a flat surface and depending on the direction you want to peek, press Mouse 1 or Mouse 2. It’s simple yet effective.
2. The Reverse Flash
The reverse flash is one of Phoenix’s strongest assets in ranked games. By throwing the flash opposite of where you want to peek, you allow enemies more time to react, forcing them to turn and giving you free kills. This flash is versatile and safer than the bank flash, especially useful when enemies are close or behind teammates who are fighting.
Phoenix’s flash is often misused by players who throw it too close to the angle they’re trying to peek. Here’s how to use it more effectively:
- Distance Matters: Stand further back when flashing to reduce the enemy’s reaction time to the flash animation.
- Vertical Flashing: Incorporate vertical flashes to remain unpredictable.
- Bang Flashing: Flash against the wall opposite to the direction you want to swing. This technique allows for faster reaction time and maintains your crosshair placement.
3. Utilizing Phoenix’s Wall
Phoenix’s wall is powerful for escaping, blocking sightlines, and healing. You can also use it creatively, like walling over objects to create impromptu smokes. For example, on A site split, use the wall to block angles and help your team push. Flash zones can be created using the wall, forcing enemies to turn or get blinded, often leading to easy kills.
Phoenix’s wall serves two primary purposes: healing and facilitating team movement from point A to point B. However, there are advanced techniques to maximize its effectiveness:
- Healing and Mobility: Use the wall when low on HP to heal up. It also helps your team navigate safely by blocking enemy vision.
- Creating Gaps: Intentionally create gaps in the wall to set traps. If an enemy tries to scale up using your wall, you can hold the gap and secure an easy pick.
4. Mastering Fundamentals
Mastering fundamentals like crosshair placement, counter-strafing, peeking, spacing with teammates, and positioning is crucial. Consistent high performers in matches excel in these areas. Taking courses, like the Aim God Master Class, can help improve these skills and keep you updated as the game evolves.
5. Flash Zone Manipulation
Create new flash zones using Phoenix’s Molly or wall. For example, on Bind showers, throw a Molly to create a flash zone, then flash back in to catch enemies off guard. This technique can shift the dynamics of a fight, giving you the upper hand.
6. Combining Utilities
Phoenix’s utility is basic but effective. Combining them can secure easy fights. For instance, use the wall to block vision and then flash through it to gain ground on opponents. On Split B site, wall out to let your team enter, then flash through the wall to blind enemies and take control.
7. Multitasking with Utility
Phoenix’s utility is great for multitasking. Use your Molly to heal while planting the spike or to push an area with your gun out. Healing on the edge of the Molly prevents getting spammed. Remember to use the Molly for more than just healing; it’s a crucial piece of utility.
8. Faking with Utility
Phoenix’s main roster status means most players know his utility. Use this to your advantage. For instance, fake movement with a wall or Molly. Throw a Molly to one spot and reposition to catch enemies off guard. This strategy can win many duels.
9. Using the Ultimate
Phoenix’s ultimate, Run It Back, is powerful but often misused. Players rush with it, but you have 10 seconds to make a play. Use the time wisely. Don’t be afraid to flash, grab a gun, or the spike. Farm orbs to use the ultimate as often as possible. On maps like Fracture, it’s easy to farm orbs, making the ultimate even more impactful.
10. Continuous Improvement
Keep learning and adapting. Phoenix’s utility and playstyle offer endless possibilities. Stay ahead by constantly updating your strategies and seeking new tips and tricks.
Phoenix may not be the best duelist, but in certain maps and situations, he can outshine everyone. Don’t underestimate his potential. Keep practicing and using these tips to climb the ranks in Valorant.
11. Mastering the Molly
Phoenix’s molly, like his wall, is versatile and serves two main functions: healing and denying space.
- Safe Usage: Always use the molly from a safe position to avoid exposing yourself. Throwing utility recklessly can result in being caught off guard.
- Denying Time and Space: Use the molly to delay enemy advances, giving your team time to rotate or reposition. On attack, preemptively clear 50/50 angles to simplify your entry onto the site.
12. Effective Flash Usage
Phoenix’s flash is often misused by players who throw it too close to the angle they’re trying to peek. Here’s how to use it more effectively:
- Distance Matters: Stand further back when flashing to reduce the enemy’s reaction time to the flash animation.
- Vertical Flashing: Incorporate vertical flashes to remain unpredictable.
- Bang Flashing: Flash against the wall opposite to the direction you want to swing. This technique allows for faster reaction time and maintains your crosshair placement.
13. Entry Fragging with Confidence
When entry fragging, utilize at least two pieces of utility to maximize effectiveness:
- Scaling the Site: Clear close left, close right, and switch positions. Ensure the site is safe for your planter.
- Prioritizing Angles: Use your utility to clear specific angles, reducing the risk of an enemy hiding in an unchecked spot.
14. Maximizing Phoenix’s Ultimate on Attack
Phoenix’s ultimate, Run It Back, is crucial for effective site entry:
- Orb Collection: Prioritize collecting orbs to maximize the number of times you can use your ultimate per half.
- Clearing Space: Use your ultimate to clear close angles and high-risk areas, allowing your team to focus on other threats.
- Planting the Bomb: Sometimes, using your ultimate to safely plant the bomb is a strategic move, preventing your team from getting picked off during the plant.
15. Defensive Strategies with Phoenix
Playing defense with Phoenix involves aggressive and unpredictable plays:
- Orb Collection for Retakes: Use your utility to secure orbs, increasing the chances of having your ultimate for crucial retakes.
- Site Switching: Avoid playing the same site every round to prevent the enemy from reading and countering your strategies.
- Retake Utility: During retakes, use your molly to clear tough angles and your flash to gain entry to the site. Always aim to clear the hardest angles for your team to ensure a smooth retake.


